NextSTART 1.0
Component of the
WinSTEP 2000 Project
|
NextSTART License and Warranty
The NextSTART program and all included documentation are all Copyright 1999 by Jorge Coelho and John T. Folden. All Rights Reserved.
The NextSTART program logo was created by José Carlos Baldo.
The NextSTART web page was created by John T. Folden. John should also be credited for most of the menu themes in the theme pack, for the part of the text in this User’s guide that promotes NextSTART and for some excellent ideas in implementing this program and the WinSTEP 2000 suite.
THIS SOFTWARE IS DISTRIBUTED "AS IS," WITHOUT WARRANTY AS TO PERFORMANCE OF MERCHANTABILITY OR ANY OTHER WARRANTIES WHETHER EXPRESSED OR IMPLIED. BECAUSE OF THE VARIOUS HARDWARE AND SOFTWARE ENVIRONMENTS INTO WHICH THIS PROGRAM MAY BE PUT, NO WARRANTY OF FITNESS FOR A PARTICULAR PURPOSE IS OFFERED. GOOD DATA PROCESSING PROCEDURE DICTATES THAT ANY PROGRAM BE THOROUGHLY TESTED WITH NON-CRITICAL DATA BEFORE RELYING ON IT. THE USER MUST ASSUME THE ENTIRE RISK OF USING THE PROGRAM.
You can contact me with comments or questions by e-mail at winstep2000@xoommail.com
The 32-bit version 1.0 of Windows NextSTART is NOT freeware altough it requires no registration fee. You are not allowed to reverse engineer or change the contents of the program files.
Windows NextSTART may not be sold nor be used in any profit-oriented endeavor without the express written permission of the author with the exception that Windows NextSTART may be distributed freely via media intended to make shareware available to the public for trial. All files, including the Windows NextSTART program and all others in the Windows NextSTART zip file, must be included.
All trademarks used in this Document are the property of their respective owners and are used for explanatory purposes only.
What is the WinSTEP 2000 project?
The WinSTEP 2000 project is a suite of groundbreaking components for the Windows 32-bit environment.
The purpose of this suite is to provide usability enhancements to the standard Explorer Shell while at the same time providing the user with unlimited flexibility.
The first component of the WinSTEP suite is NextSTART, a powerful Start Menu replacement. Other components will be a Dock, a File Viewer and an Attributes inspector.
NextSTART is a powerful, dynamic pop-up menu that can be used as a replacement or supplement to the Windows Start Menu. NextSTART also offers an incredible amount of flexibility so that the user can customize it to his needs and desires. What follows is just a brief description of it's many useful features...
Customizable Titlebars and Buttons:
You can choose the font, the height, the colors (even use gradients!), 3D effects, if icons are displayed and more!
You can make NextSTART look and behave like regular Windows menus or emulate the look and feel of menus in other operating systems.
Theme Support:
You can create your own themes based on the options above and then save and restore them at will. Trade with your friends!
Customizable Menu Behavior:
You can even configure how the menus behave! Choose where scroll-bars are located, how menu selection is made, which mouse button activates the menus, assign hot keys and more!
Hot Spot Support:
Thanks to an incredibly flexible feature utilizing user defined Hot Spots, you can "attach" a menu to not only different areas of your desktop but also other menu programs and applications!
Dynamic Menus:
Unlike many other menu programs, NextSTART does NOT require you to re-enter the paths to all the programs listed on your Start Menu. NextSTART will automatically read the directory structure of your Programs folder and create a menu for you on the fly! In fact, thanks to NextSTART's dynamic menu support, it will create as many menus as you wish based on any hard drive or directory! Menu maintenance is also a snap, make a change to any directory and NextSTART will display the changes the next time you access it.
To install NextSTART simply unzip NextSTART.ZIP and run the install program, then choose what folder you want NextSTART to be installed at.
The NextSTART install program will not create any program groups in your Programs folder, instead it will create a single shortcut at the root of this folder. Place this wherever you want - on the desktop, for instance, or on the Startup group if you want NextSTART to execute every time you run Windows.
Running NextSTART for the first time
NextSTART relies on a ‘hotspot’ system that enables you to ‘attach’ different menus to different applications or locations of your desktop. By default, NextSTART comes with a single hotspot that is attached to your desktop and covers it’s entire area minus enough space on the left for a single row of desktop icons.
Since this might not be what you want, when you run NextSTART for the first time it will automatically open the preferences window and prompt you to make it’s initial configuration.
If you accept the default configuration as it is – by pressing the OK button - then NextSTART will show a menu holding the contents of your programs folder every time you click on the desktop with your left mouse button.
If you have any trouble with this just double-click the NextSTART icon in the tray bar or press CTRL-F12 to bring up the preferences window again.
As previously mentioned, NextSTART relies on different ‘hotspots’ to show up to 10 individual menus. So what are hotspots?
Hotspots are areas on the desktop – or on any other applications – that, when clicked on, will show the menu currently associated to that hotspot.
Let’s give you a practical example:
Suppose you want NextSTART to display a menu when you click on an 8x8-pixel square at the upper left corner of the desktop. To accomplish this, follow these steps:
That’s it. Press OK and left click on the top left corner of the desktop. A menu containing your most recently used documents - just like the ‘Documents’ sub-menu of Windows Start Menu – should pop up right next to your newly created hotspot.
Now, if hotspots enable you to define different menu contents and pop up areas, the Title, Button and Menu tabs in the preferences window allow you to define the look and feel of these menus. The General tab, on the other hand, allows you to define how NextSTART itself behaves.
The preferences window can be
invoked in 4 ways: By double clicking on a menu’s titlebar,
by double clicking on NextSTART’s tray icon, by right
clicking on this icon and selecting Preferences or with the
keyboard by pressing CTRL-F12. This latest key-combination can be
changed, if necessary, in the preferences window itself.
The preferences window can be moved by clicking and dragging the
vertical logo.
The Title tab allows you to configure how the title bars of your menus will look like.
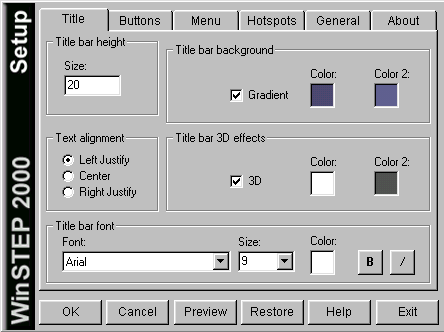
The Title bar height defines the vertical size, in pixels, of the title bar of your menu. This number must not be greater than 99. If it is set to 0 then the menu will have no titlebar, just like the menus in Windows.
The Title bar background is where you define the background colors of your titlebar. If Gradient is selected then you can have a gradient background that starts with the first color and finishes with the second. To use other colors just click on the color buttons and choose a new color from the color palette.
The Title bar 3D effects is where you define if the title bar has a ‘Flat’ or ‘3D’ look. If 3D is selected then you can also define the colors used to obtain this effect.
Text Alignment allows you to specify how the text in the titlebar shows up, either centered or justified to the left or right.
In TitleBar Font you can specify the font used to display the titlebar text as well as its color and size in points. Remember that pixels and points are not the same: There are 20 points in 15 pixels. The B and I buttons stand for Bold and Italic, respectively. If they appear in bold the option is on, off otherwise.
The Buttons tab allows you to configure how each button (item) in your menu will look like.
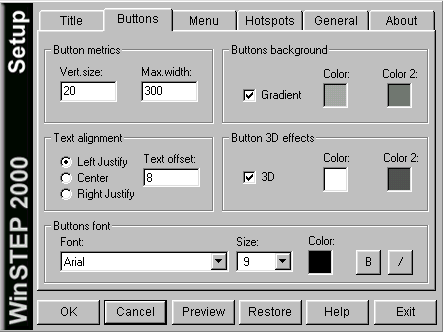
The Vert.size box defines the vertical size, in pixels, of each of the buttons in your menu. This number must not be greater than 99.
In the Max.width box you can specify a maximum button width (in pixels). This prevents items with very long names from creating extremely wide menus. NextSTART will, however, always respect a minimum width for each menu.
Text Alignment allows you to specify how the text in the button shows up, either centered or justified to the left or right. With the later two options you can also define the Text offset or menu ‘margin’, i.e.; how many pixels should exist between the menu’s border and the start of the button’s text.
The Buttons background is where you define the background colors of your buttons. If Gradient is selected then you can have a gradient background that starts with the first color and finishes with the second. To use other colors just click on the color buttons and choose a new color from the color palette.
The Button 3D effects is where you define if the menu has a ‘Flat’ or ‘3D’ look. If 3D is selected then you can also define the colors used to obtain this effect.
In Buttons Font you can specify the font used to display each menu item as well as its color and size in points. Remember that pixels and points are not the same: There are 20 points in 15 pixels. The B and I buttons stand for Bold and Italic, respectively. If they appear in bold the option is on, off otherwise.
The Menu tab allows you to configure how your menu will behave.
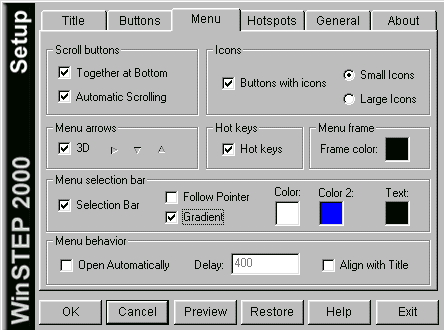
In Scroll Buttons you can specify the position and behavior of the two scroll buttons that appear if the menu is just too big to fit on screen. If Together at Bottom is selected you can scroll the whole menu up and down without ever moving the mouse pointer from the bottom menu area. If it is unchecked, then you will have to move the mouse pointer to the top of the menu to scroll up and back to the bottom to scroll down. If Automatic Scrolling is enabled then there is no need to click on the scroll buttons to scroll the menu, just position the mouse pointer over one of them and the menu will begin scrolling automatically.
At Icons you can select if the menu displays item’s icons or not. If Buttons with icons is selected then you can also specify if you want small icons (16x16) or large icons (32x32).
Menu Arrows allows you to specify what kind of arrows is displayed when a menu item leads to a sub-menu. If 3D is selected then the arrows will have a 3D look, otherwise they will have a flat look much like the arrows in normal Windows menus. These flat arrows will automatically be displayed in black for a light button background and white for a dark background.
If the Hot Keys box is checked, some of the menu buttons will have a command key equivalent for their function. This command key will appear as a small letter at the right of the menu. Press this letter on the keyboard together with CTRL and that item will be executed. Note, however, that items leading to sub menus have no command key equivalent.
In Menu Frame you can select the color used to draw the borderline surrounding the menu.
In the Menu Selection Bar you can decide if a menu item should be highlighted or not when selected. If you want the selection bar to automatically follow the mouse pointer as you move it over the menu then you should also select Follow Pointer. You can also specify the colors of the selection bar and highlighted text as well as if a gradient should be used or not.
Note that if you don't use a menu selection bar then you also won't be able to navigate the menu using the keyboard.
The Menu Behavior section is where you specify if a sub-menu should open automatically as the mouse pointer moves over it. How long must the mouse stay over the same button (in milliseconds) for this to happen can be defined in the Delay box. If Align with Title is selected then sub-menus will always vertically align with the title bar of the previous menu instead of to the button that was clicked on to open them.
The Hotpots tab allows you to configure up to 10 different menus. Each menu can be associated to a specific application or window. You can also define where the menus show up and where you have to click to make it happen.
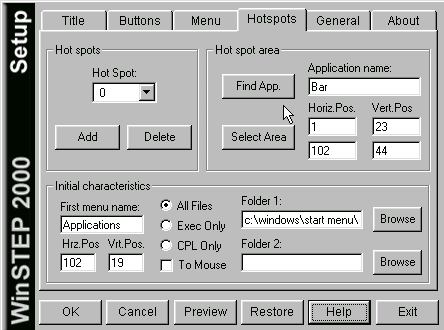
Under Hot Spots you can add, modify or delete hot spots. You can have a maximum of 10 different hot spots (0 to 9). Press the Add button to add a new hotspot, the Delete button to delete the current hot spot or, alternatively, click on the Hot Spot combo to choose the hotspot you want to modify.
The Hot Spot Area is where you define where the hotspot is located. The Application name holds the name of the window you want to ‘own’ the current hot spot, that is, the hot spot will only exist over that particular window. If you want to display a menu by clicking on the Windows desktop, then this box should be left blank or hold the word ‘Desktop’.
For best results, however, always click on the Find App. button - with the window you want on screen – and, without releasing the mouse button, drag the mouse cursor over to this window. Once the windows name appears in the Application name box, release the button.
The Horiz.Pos. and Vert.Pos. boxes hold the coordinates of the hot spot – in pixels – relative to the upper left corner of the owner window. These four values thus define a rectangle inside this window, which, when clicked on, will show the menu associated to that hot spot.
As before, the best in this case is to press the Select Area button as this will enable you to draw that rectangle yourself without having to specify physical coordinates. However you should only do this if you used the Find.App. button to capture the owner window. When you press this button the NextSTART preferences window and menu are hidden and the cursor turns into a cross-hair. Click on the place you want the hot spot to start – this should be inside the owner’s window area – and drag to draw a rectangle. When you release the button the Horiz.Pos. and Vert.Pos. boxes will have been filled with the correct coordinates of the hot spot.
A hotspot – and corresponding menu – can, as stated before, be associated to the Windows desktop itself or to a particular window. The difference is important. If you define a hot spot associated to a window, the menu will only appear when that window is on screen and you click inside it and on the hot spot area. Move the window and the hot spot moves with it.
The Initial characteristics is where you define the title of the first menu that shows up – in the First menu name box – and the coordinates, in pixels and relative to the upper left corner of the owner window, at which it should appear. If you used the Select Area button to let NextSTART know where the hot spot is, then the Horiz.Pos. and Vert.Pos. text boxes - which hold the menu’s top left coordinates - will already have been automatically filled. By default NextSTART always shows the menu just after the hotspot area. Be careful with this if you choose your entire desktop area as an hotspot, the menu might end up off-screen.
If, on the other hand, you prefer the menu to show up at the exact place where you clicked on the hot spot, then enable the To Mouse option. This will make the menu snap to the current mouse position. Note, however, that the menu will never pop-up off-screen, so NextSTART might automatically adjust it's initial position to prevent this from happening.
When a menu shows up, its position is always relative to that of the window that owns the hotspot. However, since the Windows desktop is fixed and covers the entire screen area, a menu associated to the desktop will always appear at the same absolute position. Not so if you associate the hot spot to a window or application. In such a case the initial position of the menu will depend on the on screen position of it’s owner window. Move the window to the right and the next time you click on that hotspot – which also moves with the window - the menu will have moved the same exact distance to the right (unless this would cause it to be displayed outside the screen area, of course).
If you don’t specify a menu title in the First menu name box, then the title used for the first menu of this hot spot will be the name of the initial folder.
The All Files, Exec Only and CPL Only options allow you to filter the files that are displayed in the menu:
All Files: All files and folders are displayed (default).
Exec Only: Only folders and files with the extension exe, com, bat, pif, cpl and lnk (shortcuts) are displayed.
CPL Only : Only *.CPL files (Control Panel files) are displayed. Folders are NOT displayed.
In Folder 1 and Folder 2 you can define up to two folders whose contents will be displayed by the menu.
Why two folders? Well, on its current version, NextSTART’s main purpose is to display the contents of your Start Menu’s Programs folder. This, under Win9x, is normally located at C:\Windows\Start Menu\Programs.
Under NT, however, there are two program folders. The ‘All Users’ folder – usually at N:\WINNT\Profiles\All Users\Start Menu\Programs – and the current user folder, which, for most users who run NT in their home PCs, is at C:\WINNT\Profiles\Administrator\Start Menu\Programs.
By specifying the two paths when running under NT, the user can combine these two folders into a single menu.
But NextSTART is not limited to only displaying the contents of the programs folder. Here is a list of other useful folders for users of Win9x:
‘C:\Windows\Recent’ – Holds shortcuts to your most recently used documents.
‘C:\Windows\Favorites’ – Holds the contents of Window’s Favorites menu.
‘C:\Windows\ Desktop’ – Holds the contents of the Window’s desktop.
Under the current version this is pretty much what NextSTART does: Display folders and sub-folders as a menu. But what it does now, it does very well. You can even use it to browse your entire hard drive, although in practice this is not recommended since some folders can be very large and result in long delays to display them, specially if the Use Icons option is enabled.
However, future versions of NextSTART will mimic and surpass the functionality of the Windows Start Menu, as well as improve it in a lot of aspects. Coupled with the functionality of the other components in the WinSTEP 2000 project, NextSTART will allow you to entirelly dismiss the standard Explorer Shell, or, at the very least, extremelly enhance it.
The General tab allows you to configure miscellaneous elements of NextSTART.
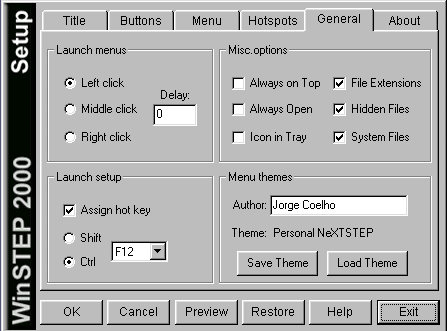
In Launch Menus you can define which mouse button is used to launch menus. If you choose the left mouse button, then the Delay parameter can also be used to specify if you want NextSTART to distinguish between single and double mouse clicks. This can be important if your hotspot covers the entire screen or you have icons spread all over the desktop. NextSTART is unable to distinguish if you are clicking on an empty area of the desktop or on an icon and it can be terribly confusing to double-click on an icon and have both your application and a NextSTART menu launched at the same time.
To avoid this, when you first click on a hotspot NextSTART waits a little longer to see if there is another click comming. Once it has waited the time specified in Delay with no further clicks happening, it launches the menu. The default Delay value (12) is calibrated with the normal interval Windows uses to distinguish between double clicks and two single clicks in quick sucession. If this is not enough for you or you normally double click faster, you can respectivelly increase or decrease this value. Just remember that the higher the value the longer it will take for your menus to be launched. The oposite is also true. In fact, if your desktop hotspot does not cover any icons, you can set this value to 0 and your menus will launch immediatelly.
If you select Always on top, then NextSTART menus and windows will always show up on top of all other windows, no matter what.
if Always Open is checked then the menus will not automatically close when you launch an item, and will stay on screen until you deliberatelly close them by clicking on their titlebars. Note that even if Always Open is unchecked, you can still launch an item and make the menu stay on screen by holding the CTRL key while you click on that item.
If you uncheck Icon in Tray you can prevent NextSTART from adding a tray icon.
If File Extensions is checked, then all files whose extension is not .LNK, .URL, .PIF and .CPL will have their file extensions displayed on the menu instead of just the filenames.
Checking Hidden Files and System Files will make NextSTART display hidden and system files in the menu as well.
In Launch Setup you can define a new hot key combination to invoke the preferences window or simply disable this function altogether by not checking Assign hot key. The default key combination is CTRL-F12.
The Menu Themes area allows you to save your own menu themes as well as load other themes that came with NextSTART or that you and your friends made. A theme file holds the entire look and feel – as defined in the Title, Buttons and Menu tabs – of a menu. Since NextSTART is so flexible, you can even create themes that emulate other operating system’s menus - such as the ones in NeXTSTEP, OPENSTEP and the MacOS, for instance.
Before saving a theme you should type your name in the Author box. This box will also hold the author's name of any theme you load. The name of the theme currently loaded is also displayed in the Theme box.
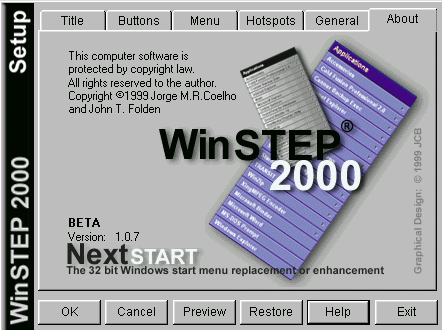
The Preferences window Command Buttons
The row of buttons at the bottom of the preferences window perform the following actions: The OK button applies and saves any changes you made and closes the preferences window. The Cancel button reverts all changes made and also closes the preferences window. The Preview button allows you to preview changes to the look of the menus without saving. The Restore button reverts all changes made but remains on the preferences window. The Help button summons up the help file. Finally, the Exit button exits NextSTART. A confirmation will be requested.
Note that what happens when you press the Help button depends on you having Microsoft Internet Explorer installed or not. If IE is installed, NextSTART will display the HTML help file with it's internal browser. If IE is not installed, then NextSTART will try to launch the default browser for that system, and report an error if it does not succeed.
Introduction to the Menu system in NextSTART
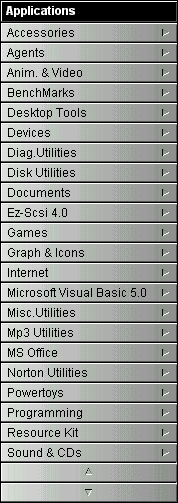
Menus provide a list of commands that can be executed. You are probably more than familiar with the menu system used by Windows. NextSTART, however, introduces you to a completely flexible menu system where just about anything can be configured. In the future, all the menus used in the remaining components of the WinSTEP 2000 project will assume the look and feel you specify under NextSTART.
Generally Menus have the following layout:
Titlebar: The titlebar holds the name of the menu. You can use it to move and close the menu and to access the preferences window.
Menu area: The menu area holds the actual contents of the menu. If there is an arrow to the right of an item this means that clicking on that item will open a sub-menu, otherwise the item is a 'command item'. If there is a lower-case letter instead, then pressing CTRL together with that letter key on the keyboard will execute this item.
If the menu is empty - i.e.; it has no items - then a single button with the word '(Empty)' will be displayed. On the other hand, if the menu holds more than roughly 818 items ( the exact number is dependent on the vertical size of each button ) then the last entry on the menu is a special button labeled 'More...'. This button, when pressed, will open a new sub-menu containing the remaining 818 items and so on...
Selection Bar: The selection bar allows you to know which item is currently selected. If you prefer you can have no selection bar at all or have the selection bar automatically follow the mouse pointer as it navigates the menu.
To move a menu simply click on the titlebar and drag. Note, however, that moving the main menu will automatically update its relative position to the owner window in the hotspot list. What this means is that the next time you click on that hot spot the menu will appear at the last position you dragged it to. Sub-menus, however, will not remember new positions.
If you try to drag a menu that has an open sub-menu tree then NextSTART will first close all the open sub-menus.
To close a menu and any open sub-menus after it, right-click on the menu’s titlebar. If you have the selection bar enabled then you can also press the ESC key.
To keep a menu on screen and close only any open sub-menus after it, left-click on the menu’s titlebar.
To close all menus, click anywhere else on the desktop or on another window. Note that this will not work if you have enabled the Always on screen option in the general tab of the preferences window. In that case you will have to right-click on the first menu’s titlebar.
To navigate a menu you can use either the mouse pointer or - if you have the selection bar enabled - the keyboard.
When using the mouse to navigate, simply click on the item you want selected. If that item leads to a sub-menu ( denoted by an arrow at the right ) then a new menu will appear next to it, otherwise the associated command is executed.
It’s always a good idea to have the menu selection bar enabled as this will also allow you to navigate the menu using nothing but the keyboard if you want. You can then use the up and down arrow keys to change the currently selected item, or you can press a letter key and the selection bar will cycle through all the items whose name starts with that letter. When using the arrow keys and the beginning or end of a menu is reached, the selection bar will simply wrap-around. If the menu is too big to fit on screen, it will automatically scroll to show the currently selected item.
To jump directly to the begining or end of a menu, use the Home and End keys.
You can use the left and right arrow keys to jump between sub-menus and parent menus: Pressing the right arrow key or the enter key on an item that leads to a sub-menu will open that menu. Pressing the enter key over a command item will execute that command. Pressing the left arrow key will close the current sub-menu and pass control to it’s parent menu.
Pressing ESC will close the current menu.
To execute a command item with the mouse, simply click on the item that you want to execute. You can also execute command items using the keyboard, in one of two ways:
If the Hot keys option is enabled in the menu preferences tab, then the command item might have a lower case letter displayed at the right. If that is the case, then you can press the CTRL key together with this letter to execute the command.
If the selection bar is enabled, then you can also navigate the menu as explained in the previous section and execute the command by pressing the enter key. If you hold the CTRL key while pressing enter, the menu will not automatically close - even if Always Open is unselected.
To open a sub-menu item as a folder in Explorer instead of as a NextSTART sub-menu, simply double click on that item. There is no keyboard equivalent.
When the menu is too big to fit vertically on the screen, it will display two scroll buttons. These scroll buttons can be located either both at the bottom or one at the top and the other at the bottom (classic Windows style):
 ....
....
It can be argued that having both scroll buttons at the bottom has more advantages, since you don't have to move the mouse so much when scrolling up and down. In the end it's all a question of style and personal choice.
If the Automatic Scrolling option in the Menu tab is enabled, then there isn't even any need to click on a scroll button: just move the mouse pointer over it and the menu will start to scroll automatically.
Something that might be important to mention is that NextSTART menus cannot hold more than roughly 819 items (for a button size of 20 pixels). If you're using NextSTART to display a folder holding more than that number of items, then be aware that only the first 818 files will be displayed on the first menu. At the end of the menu there will also be a 'More' button: Press this 'More' button and another menu will show up displaying the next 818 items and so on...
To quickly access the 'More' button, press the END key on the keyboard. This will make the selection bar jump to the end of the menu.
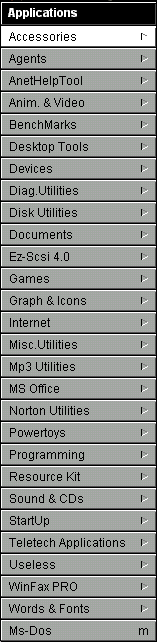
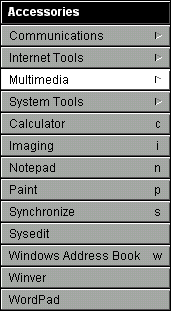
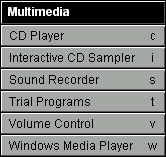
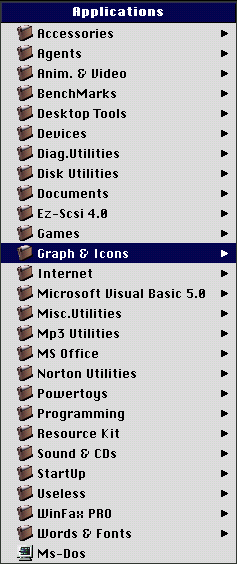
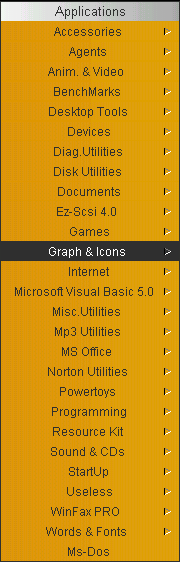
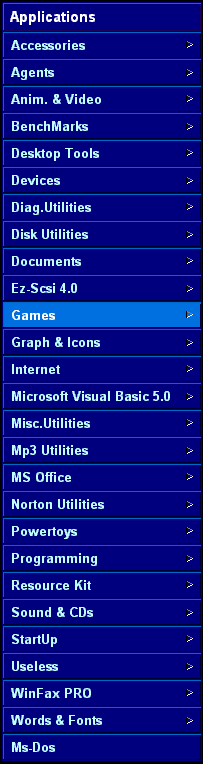
The following pages hold examples of what can be accomplished with NextSTART. These examples are part of the theme pak that comes with the program.
OPENSTEP EUI theme by John T. Folden.............Mac OS X Server theme by John T. Folden.
................
Win98 theme by Jorge M. R. Coelho.....................BlackBox – Gold theme by John T. Folden
............
The Dragon´s Layer theme by José C. Baldo........Game Programmer theme by José C. Baldo
.....
To uninstall NextSTART you can use the Add/Remove Programs applet in the Control Panel or you can simply delete the directory at which it was installed and any shortcut icons to it. NextSTART does not use the windows registry, therefore no unwanted clutter will be left behind.
So what is planned for the next version of NextSTART? Many, many enhancements and features. Take a peek at some of them:
. Complete Start Menu replacement.
. Ability to assign special built-in commands ( like shutdown Windows, etc... ) to buttons.
. Powerful Menu editor allowing creation and linking of menus holding built-in commands, etc...
. Multiple detachable menus.
. More gradient options.
. Bitmap backgrounds for buttons and titlebars.
. Bitmap ‘Close Menu’ titlebar buttons.
. Bitmap Menu arrows.
. Horizontal and vertical menus.
. App. related menus: Pop up when you open an application and disappear when you close it.
. Animation and sound support.
Unfortunately the next version of NextSTART will no longer be free but rather shareware. It will, however, be by then totally integrated with the spirit and functionality of the remaining WinSTEP 2000 applications.
You can download the latest version of NextSTART from
For questions and support just e-mail me at
Special thanks to John T. Folden for his wonderful ideas, web page design, graphics, comments and bug testing.
Special thanks to José Carlos Baldo for designing the logo and for helping with the graphical layout of the program.